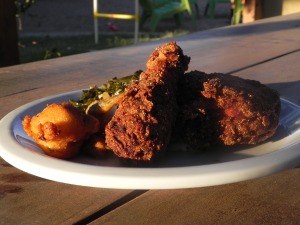
Every good piece of homemade chicken I've ever had is significantly darker colored than the stuff you buy at a restaurant, but I don't know why.
As time marches on and the posts start to pile up here at Redneck Fresh, you will quickly learn that I really, really love chicken. To be a little more specific, I love chicken that is still on-the-bone and, when I can get them, whole chickens. If cooked right, there are very few proteins that are juicier or more flavorful than bone-in chicken. Especially bone-in fried chicken.
Crunchy and juicy, flavorful and somehow not even greasy? Yes, you’ve just bitten into well-made fried chicken. I’ve been on a quest to perfect my fried chicken recipe for a couple of years now, and I’m getting pretty close. This recipe, while delicious, is definitely on the more redneck end of the “redneck fresh” spectrum: there are no vegetables of any kind. However, I made some awesome fried mushrooms and green beans with the chicken that were definitely fresh. I’ll include those recipes, too, but I’ll try to keep them shorter.
I fried in a deep, straight-sided skillet because that’s what I had available; if I had my kitchen stuff, I would use either my cast iron skillet or cast iron dutch oven. If you have cast iron, it is the best possible vessel in which to fry because of how evenly it distributes heat and how long it takes it to cool off. Make sure you have a lid, though, because this recipe calls for covering your chicken while it fries. Alright, let’s get to it.
Buttermilk Ranch Fried Chicken
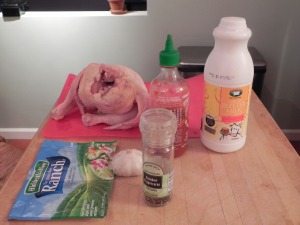
Stuff
2 whole chickens
3 c. buttermilk
2-3 c. four
2-3 c. cornmeal
2 packets ranch dressing seasoning
1 T. Sriracha sauce
cinnamon
salt
pepper
a lot of oil (I used peanut and vegetable)
Steps
The day before you’re going to actually fry chicken, you’ll have to get it soaking in buttermilk. First, go ahead and make the buttermilk marinate in a pyrex dish or a bowl of some kind. Don’t marinate in a zipper bag, you’ll end up getting buttermilk everywhere and it will be gross. Combine the buttermilk, about half a packet of ranch dressing seasoning, about a teaspoon of black pepper and the Sriracha sauce. Mix well. If you want spicier chicken, put in a lot more Sriracha. Like four times more. While your marinate will have an unappetizing pinkish glow to it, your chicken will be spicy and delicious.
Get your chickens out and see if they feel a little bit slimy or not. If they’re slimy, rinse them off (gently though, you don’t want to separate the skin from the flesh). If you want to, you can buy your chicken pre-cut into pieces, usually for free. I, however, have an odd affinity for cutting up chicken, so I did it myself and made a video, in case you also like to butcher your own poultry:
As you cut the chicken, lay it into the buttermilk and turn it over to ensure that you have a good thorough coating. Cover the dish with plastic and put it in your fridge until tomorrow, when it’s chicken frying time.

The ideal temperature for frying chicken is between 350-375. Make sure you leave a couple of inches of space so that your pan doesn't overflow.
Before I start talking about frying chicken, let’s discuss frying in general for a little while. The key to frying things that come out crispy and delicious is to fry hot enough. There are two parts to frying things at the right temperature: First, be sure you wait long enough for it to reach the proper temperature before you start cooking. Second, make sure you don’t put too many things in the pan at the same time. Everything you add to a pan of oil drops the temperature; oil that’s too cold makes for greasy, soggy food.
You want to fry chicken between 350-375, which means that when you put chicken in the pan you should be closer to 375 because of the temperature drop that occurs when cold things, like chicken, go into hot things, like oil. Once you have fried a lot of things, you will start to get a feel for what oil temperatures are based on how much sizzle you get when you drop things in the pan; until you get there, use a meat thermometer, a candy thermometer or one of those really cool surface temp instant read infared contraptions. On the electric stove I was using, I was bouncing the temperature between 6-10 the whole time I was cooking. Alright, back to frying chicken.
I fried my chicken in about two-thirds peanut oil and one-third vegetable oil, mostly because I was too cheap to buy more than one 12 ounce container of peanut oil. Peanut oil is awesome for frying because of the flavor it imparts onto food. Also, although I have no scientific backing for this, I feel like food fried in peanut oil comes out crispier and less likely to be soggy. Pull your chicken out of the fridge and start heating up the oil, because it takes awhile.
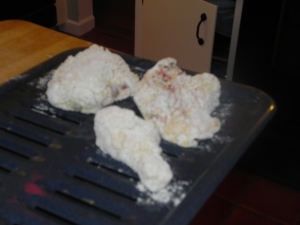
To bread the chicken, you’ll need a dish in which to apply breading and a rack to set pieces on while you wait to fry them. Only batter a few pieces at a time; it doesn’t do the chicken any good to sit with breading on it before it’s fried.
Mix up the breading for your chicken about two cups at a time. Take a cup of flour and a cup of cornmeal, and add about half a packet of ranch dressing, a tablespoon of salt, a little bit of pepper, and half a teaspoon of cinnamon to it.
You’ll end up needing a couple of batches at least if you fry two whole chickens. Pull a piece of chicken out of the marinade, but make sure it still has a good coating of buttermilk on it. Set it down in the flour and push it down. Using the same hand you used to pull the chicken out of the buttermilk pan, carefully turn it over and repeat the process on the back side. Pile some of the breading up on top of the chicken using your other hand. The idea is to get a good coating of flour on the piece of
chicken while keeping one hand wet and the other hand dry. If you succeed, washing your hands will not be particularly difficult. If you fail, you’ll be washing dough off your hands every few minutes. Once a piece has a good layer of breading on it, put it on the waiting rack. Flour about 3-4 pieces at a time, you’ll have time while the pieces cook to batter the other pieces.
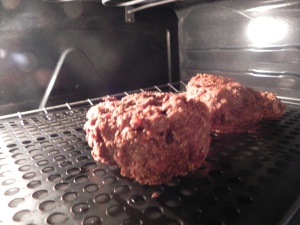
Make sure your oil is hot enough, and turn your oven on to as low a temperature as you can. A “warm” setting is ideal, but anything under 180° is fine. Put a cookie tray and a baking rack in the oven, it’s where you’ll store pieces while you fry other ones. When you’re frying chicken, try to fry similarly sized pieces at the same time. Start with drumsticks, they’re the easiest piece to do right. My pan could hold 3 drumsticks easily without over-crowding. Lay the chicken in the pan carefully, if you hover too long you’ll burn your hand, if you drop too quickly you’ll splash oil everywhere and burn whatever it hits. Now, put a lid on the pan and ignore it for 3-4 minutes. I fry with a lid on because the lid catches steam and helps the chicken to cook a little bit more evenly, but be careful — when you take the lid off the pan, don’t tilt it, or the condensed steam will fall in the oil and splatter a lot. My legs and thighs took about four minutes on the first side, then I flipped them, cooked them four minutes on the second side, then I flipped them one more time and cooked them an additional two minutes, for 10 minutes total. Breasts took about 12 minutes total: 5-5-2. For all the different kinds of chicken, I kept a lid on the pan for about 80% of the cook time.
If it’s your first time frying chicken, you may have to cut into a piece or two to see if they are done. This is not indicative of you being a failure or not good at cooking, it’s because you can’t really tell from how chicken looks on the outside if it’s cooked through. You could also use a meat thermometer and cook your chicken until it reaches an internal temperature of 160° at the bone. Anyways, once your first few pieces are done, use a pair of tongs to pick them up, let them drain back into the grease, and put them in the oven on the racks. The reason you’re using a rack instead of paper towels is that your breading will get soggy if it sits on a paper towel. Racks keep fried things away from moisture, and moisture=soggy chicken.
I mentioned in an early caption that homemade fried chicken is always a little bit darker than store-bought. I still don’t know why that is, but it’s definitely true.
Once you’ve pulled your first couple of pieces out of the oil, wait for a couple of minutes to let the grease come back to temperature before you start the next batch. Also, do not forget that your stove has an adjustment knob on it — when the chicken isn’t sizzling enough, turn it up, when it’s splattering too much, turn it down. Remember to bread pieces while other pieces fry, and try to bread similar-sized pieces, so that they can go in together. Frying chicken is time-consuming, so plan accordingly. We had some hungry children running around, so I ended up not cooking the wing pieces because they would have taken an extra few minutes. However, I wasn’t about to let all that high-dollar hot grease go to waste, so I fried up some green beans and mushrooms, too. I did not take any pictures of that process, but I will tell you how I did it.
Beer Battered Green Beans and ‘Shrooms
Stuff
1/2 c. flour
1/2 c. corn meal
1 beer (cheap is fine, but make sure it’s something you would drink)
1/2 packet ranch dressing seasoning (again)
1/2 t. cayenne
1 T. salt
1 t. pepper
1/2 lb. fresh green beans, broken in half (if they’re long; you can leave the short ones whole)
1 carton of fresh mushrooms, whole (wipe them clean with a damp paper towel, never wash mushrooms)
Steps
Combine all your ingredients that aren’t vegetables in a medium sized mixing bowl, and whisk them together thoroughly. You want this to be smooth. You’re looking for a consistency just a little bit thinner than cake batter, if it’s too thin, add a little bit more flour and corn meal. Once you’ve got your batter lump-free and the right consistency, dump your mushrooms into the bowl and gently stir them around. Walk over to your grease (still between 350-375°) and use either a fork or a toothpick to pull them out of the batter and gently drop them into the pan. Fry for 3-4 minutes, stirring them around and turning them a couple of times. Once your batter gets to golden brown, pull them out and set them next to the chicken on the drying rack. Again, fried food belongs on racks, not paper towels. Sprinkle the mushrooms with some salt and pepper (or some cajun seasoning if you’re feeling cocky) while they’re still hot.
Do the same thing you did with the mushrooms with the green beans, only use your hands instead of a fork to pull the beans out of the batter, because it’s much easier due to their shape. Stir the beans around the pan, making sure they don’t stick to each other. After 2-3 minutes, the green beans should be done. Just like with the mushrooms, pull ’em, rack ’em, and salt ’em. If you don’t overcook the green beans, they’ll have just a little bit of fresh snap to go with the battery crunch, and people will think you are a culinary genius. Now it’s time to plate all this food you just made (we also had some southern-style kale and some delicious mashed potatoes) and sit down to a delicious, although not exactly healthy, dinner.

If you want to know how to make kale delicious, repost this entry and leave me a comment and I'll email you two different kale recipes.
Let’s Eat!
-N


Looks delicious, Nathan!
I just inherited my great-grandmother’s cast irons and have been dying to fry some chicken. I’m totally trying this recipe and will report back!
Can’t wait to hear how it goes!
Nathan,
This blog rocks. I would encourage you to start smoking your own meat as well! However, you’ll be happy to know that the blog is also potentially inspiring me to throw a party with the theme: Redneck Fresh. I can imagine the food, drink, and outfits would be amazing. I’ll let you know if it happens.
-Jack Lape
I smoke meat often when I have the space and the equipment. NYC and the home of vegetarians are not the right venue for that, sadly.
Peanut oil fries better as it has a higher smoke point. It allows for the oil to be hotter without burning, thus frying better. There’s your science.
Great blog first born!! Maybe next your video could have a less…gruesome dimension. I worry you’re going to abducted by PETA any day now.